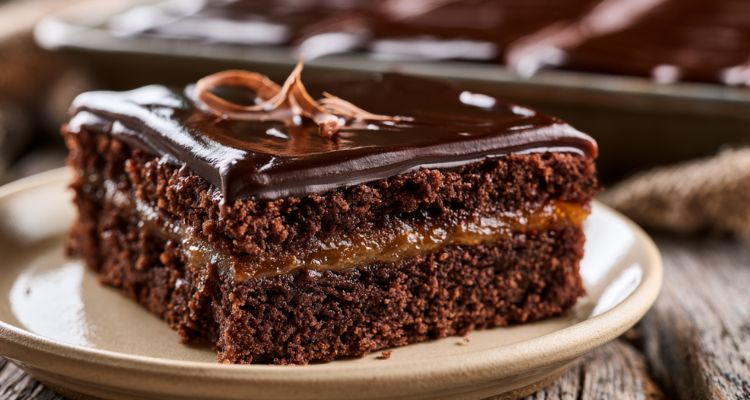
Mary Berry’s iced chocolate traybake is a cocoa sponge baked at 180°C (350°F/Gas 4) for 35 to 40 minutes in a 30×23cm tin, brushed with apricot jam, then topped with a poured chocolate icing. It cuts into 21 squares and is the closest thing to a classic school cake in Berry’s books.
Berry published this in her Ultimate Cake Book (2003) and positions it as an everyday family bake: “Chocolate cakes are always popular, and this is a particularly simple version which is great for family teas or lunchboxes.” The cocoa goes in dissolved in hot water, then everything else is beaten together in one bowl. No creaming, no folding, no fuss.
The apricot jam layer between the sponge and the icing is Berry’s secret step. She explains in her Secrets of Success: “If time allows, do brush the cake with apricot jam. It gives the cake a lovely flavour and prevents crumbs from the cake getting into the icing.” It’s the kind of detail that separates a clean-looking finish from one that’s speckled with loose crumbs.
Mary Berry Iced Chocolate Traybake
Course: DessertCuisine: BritishDifficulty: Easy21
servings15
minutes35
minutes300
kcal55
minutesBerry uses soft margarine rather than butter here, which she explains elsewhere works best for the all-in-one method because “it is of the correct consistency even when taken straight from the fridge.” The result is a lighter, softer sponge than a butter-based chocolate cake.
Ingredients
- For the sponge:
4 tablespoons cocoa
4 tablespoons hot water
225g (8 oz) soft margarine
225g (8 oz) caster sugar
275g (10 oz) self-raising flour
2 teaspoons baking powder
4 eggs
1 tablespoon milk
- For the icing and decoration:
4 tablespoons apricot jam
150g (5 oz) plain chocolate, broken into pieces
6 tablespoons water
350g (12 oz) icing sugar, sifted
1 teaspoon sunflower oil
Chocolate curls
Directions
- Preheat: Set the oven to 180°C/350°F/Gas 4. Grease and base line a 30×23cm (12×9 in) roasting tin with greased greaseproof paper.
- Mix the sponge: Blend together the cocoa and hot water, then allow to cool slightly. Measure all the remaining sponge ingredients into a large bowl and beat well for about 2 minutes until well blended. Turn the mixture into the prepared tin and level the top.
- Bake: Bake in the pre-heated oven for about 35–40 minutes or until the cake has shrunk from the sides of the tin and springs back when pressed in the centre with your fingertips. Leave to cool in the tin.
- Ice the cake: Warm the apricot jam in a pan and brush all over the cake. Place the chocolate and water in a pan and heat gently until melted and smooth. Allow to cool slightly, then beat in the icing sugar and oil. Pour over the cake and smooth over gently with a palette knife. Allow to set for about 30 minutes. Cut into squares and decorate with chocolate curls.
Notes
- Calories: Sponge: cocoa (64) + 225g margarine (1,613) + 225g sugar (871) + 275g SR flour (949) + 4 eggs (312) + milk (10). Icing: apricot jam (150) + 150g chocolate (819) + 350g icing sugar (1,362) + oil (40) + curls (109) = 6,299 ÷ 21 = 300 kcal per square
FAQs
Why does Berry brush the cake with apricot jam before icing?
Berry explains this in more detail in her Ultimate Cake Book’s ingredients chapter: “The glaze is brushed over the cake, where it sets, preventing any stray crumbs working their way into the icing. Neither will the icing become dull; with the apricot layer in between, the moisture in the icing won’t be absorbed by the cake.” It does two jobs at once, which is why she uses it on almost every iced cake in her books.
The flavour matters too. Apricot is mild enough not to compete with the chocolate but adds a subtle fruity sweetness underneath the icing that you can taste if you pay attention. I tried skipping it once and the icing looked patchier and the chocolate flavour was flatter without that background note.
Can I use butter instead of soft margarine?
Berry writes in her Ultimate Cake Book that the all-in-one method works best with “a soft baking margarine which is of the correct consistency even when taken straight from the fridge.” Butter needs to be properly softened first, and if it’s even slightly too cold the batter goes lumpy instead of smooth.
If you prefer butter, soften it thoroughly at room temperature for at least an hour before starting. The sponge will have a richer flavour but a slightly denser crumb. Berry’s Rich Chocolate Tray Bake in Mary Berry Cooks (2014) offers both options, listing “baking spread or softened butter,” so she clearly doesn’t mind either way for a chocolate cake where the cocoa dominates.
Why does Berry dissolve the cocoa in hot water first?
Cocoa powder is dry and starchy, and if you add it straight to the batter it clumps and leaves bitter, undissolved pockets in the finished cake. Berry’s Cookery Course (2015) explains the technique: mix cocoa with boiling water “to make a smooth paste” before adding it to the other ingredients. The hot water dissolves the cocoa fully and brings out its flavour.
She uses this step in every cocoa-based cake in her books. Her Rich Chocolate Tray Bake uses “boiling water” rather than just “hot water,” which dissolves it even faster. The paste should be completely smooth before it goes near the flour and eggs, so take an extra few seconds to stir out any lumps.
How is this different from Berry’s Rich Chocolate Tray Bake?
The Rich Chocolate Tray Bake from Mary Berry Cooks (2014) is a more sophisticated version with a milk chocolate ganache icing feathered with white chocolate piping. It uses less flour (175g vs 275g), adds 125ml of milk for a moister crumb, and the icing is made with double cream and grated milk chocolate rather than melted plain chocolate and icing sugar.
This Iced Chocolate Traybake is simpler and sweeter. The icing sets firmer, almost like a glaze, while the ganache on the Rich version stays softer and fudgier. Berry positions this as a lunchbox and family tea cake, while the Rich version is “great for a birthday party.” Both cut into 21 pieces from a similar-sized tin.
How do I store iced chocolate traybake?
Berry doesn’t include specific storage notes for this recipe, which is unusual. Her Rich Chocolate Tray Bake from Mary Berry Cooks says the cake “will keep for up to 1 week in a cake tin” and freezes iced for up to 3 months, and since this uses a similar sponge the same guidance applies.
Keep the squares in an airtight tin in a single layer, or stack them with baking parchment between the layers so the icing doesn’t stick. The icing sets firm enough that you can wrap individual squares in cling film for lunchboxes, which is exactly how Berry suggests using them.
Can I use a different icing on top?
Berry does exactly that in her other chocolate traybakes. The Rich Chocolate Tray Bake uses a milk chocolate ganache, and the Bonfire Chocolate Traybake from Foolproof Cooking (2016) skips icing entirely and just dusts with icing sugar. You could also use Berry’s simple chocolate fudge icing from her Victoria Sponge variations: melt 50g butter with 25g cocoa, then beat in 225g icing sugar and 2 tablespoons of milk.
If you want something closer to a traditional school cake, a thick mint-flavoured icing works well on this sponge. Swap the melted chocolate icing for 350g icing sugar mixed with 2 to 3 tablespoons of water and a few drops of peppermint extract, tinted pale green. Berry doesn’t give this variation, but the sponge base is neutral enough to carry it.